So after I built my tombstones I started thinking that I should add flickering LED candles in front of them. I wanted them to look like church candles that have been burning for awhile. Once again I looked on Youtube to find out how to build these. I kind of combined what different people did to get a really cool looking cluster of spooky flickering candles. Keep reading to see how I made them.
Shape Your LED Candles
Start by deciding how many bundles you’d like to make and what sizes you want. I wanted my LED candles to have different widths and heights so I bought 3/4″, 1″, and 1/2″ diameter PVC from Lowes. Then with a PVC cutter I cut several at different heights.
I don’t have any images for the next step so please try to use your imagination. I wanted the tops of my candles to look like they had been burning for some time. With a PVC cutter I cut random 45 degrees off each end. Then to warp the 45 degree edges so it didn’t look so straight I used a heat gun. Be very careful with heat guns. I have an ugly scar now as a reminder it takes a second to burn the crap out of your arm. When you heat the end of the PVC after a few minutes it becomes malleable. Then use pliers or other object to squash the heated end till it cools. This kind of makes them look imperfect like a real candle.
Add Dripping Wax With A Glue Gun
Now you’re ready to add the dripping wax to your candles. Again, watch it! The glue from a glue gun can really burn when it’s hot. I seemed to keep forgetting this as I yelled out “Damn” each time I burned myself. Please don’t be like me.
It’s pretty easy to add the wax. Just follow the top of the PVC and press the glue gun till the glue forms what looks like wax dripping. You can also glue the candles together if you’re building them in clusters like I did.
Paint And Stain Your LED Candles
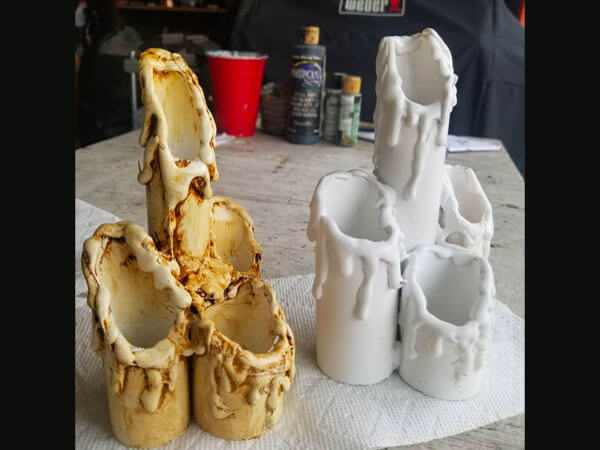
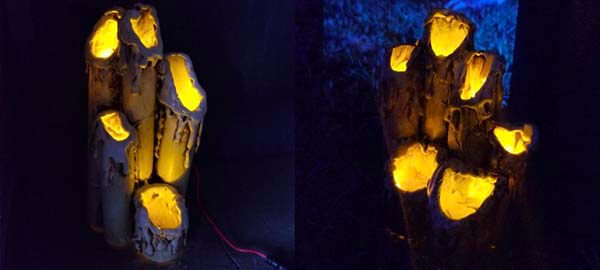
Once the glue has dried, it’s time to paint. Spray them first with a white spray paint. Be sure to spray the glue so it all looks uniform. Once dry, you can either stop here or add some more color to your candles. I used saddle tan (bought on Amazon) to stain the candles to give them a grimy dirty effect. Just goop it all over then with a paper towel wipe off the excess. See how much it improves the look of the candles?
Add The LEDs To Your Candles
You might want to seal your candles first by spraying it with some kind of clear coat. I used Satin finish clear coat spray just to help protect from damp dew. I noticed when I didn’t do this the saddle tan seemed to just come off. Sorry grass!
Now you get to use your glue gun again! Take a 5mm LED light (amber flickering) and glue one inside of each candle. You want to hide it inside so it can’t really be seen from above. The wire end should come out the bottom. Once this was done I just spliced each wire then attached all reds together and all blacks together. Finally I added an extra 18 gauge wire to lengthen the positive and negative wires so it can be used in my haunt. I also used pigtail connectors at the end so I could easily disconnect them when putting them away.
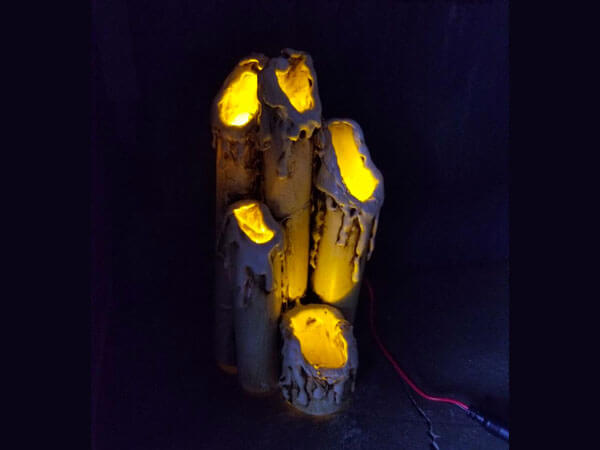
Looks pretty cool lit up right? I love how they all flicker individually like real candles. Also, they are connected to my 12 volt power source but I’ll save that for another post. If you are curious about how I did my wiring, then read this TBD. Let’s see how they look when they are all set up.
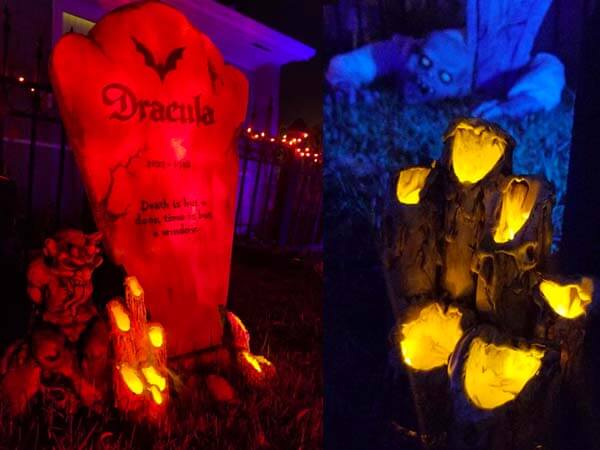
Wow! I really like these. They add so much color to the graveyard scene. It’s important to not flood your candles with other types of lights or it will be difficult to see the yellow lights flickering. A pretty easy but fun build. Just don’t burn yourselves! Have fun.